Why You Should Use TypeScript with React and How to Get Started✌

frontend lover
React is one of the most widely used frontend frameworks in the developing world today, and its popularity continues to grow. it has so many advantages like the ability to reuse components, compatibility with JSX, presence of the virtual dom, its declarative nature etc. However, it has several drawbacks when it comes to maintaining a large project with multiple developers, debugging, and testing the codebase. This is what brought about typescript 😊. Typescript is a programming language built as a superset of javascript by Microsoft, I like to see typescript as a language that obeys the rules, while javascript is the rule breaker 😂. Typescript provides a lot of features like static type checking, code completion etc which can help with catching errors and increase developers' productivity. This article will guide you through the amazing journey of integrating react and typescript
prerequisite
Basic knowledge of javascript
Basic Knowledge of react
code Editor
Passion💖
Getting Started
Creating an environment that supports the integration of React and TypeScript isn't that hard. The first thing to do is to set up the development environment for React and configure it to support TypeScript. This sounds like a whole lot, I know, but it's just a few lines of code in your terminal. We are going to use Vite to scaffold the React app template by running the following code in our terminal:
npm init vite
The next step will ask for the project name (name it whatever you desire). I named mine "TypeScriptTutorial"

choose your preferred framework in our case we are going to be using react 😎

it's going to request that we select a variant, then select typescript
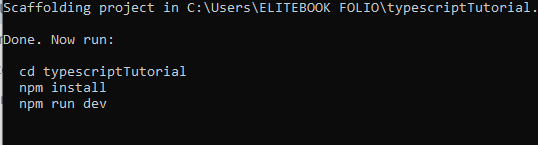
Next, navigate to the TypeScriptTutorial directory (or whatever you named yours) and run npm install. This will install all the dependencies for the project. After that, run npm run dev, which will start the development server. Then, you can start visualizing your project!
if you already have a React project written in JavaScript, you can easily convert it to a TypeScript React project by renaming the .jsx and .js files to .tsx and .ts files respectively. Then, you can edit the tsconfig.json file to specify the TypeScript compiler options and include the necessary files. Once you've done this, you can run the TypeScript compiler to generate .js files alongside your .tsx and .ts files. Don't forget to set the jsx option to "react" and "noImplicitAny" to true in the tsconfig.json file to ensure that your code is properly typed.
useState()
let's start with the usage of the react hook "useState"
import { useState } from 'react'

function App() {
  const [count, setCount] = useState(0)
  const increment = () => setCount(count + "1")

  return (
    <div className="App">
      <h1>Count: {count}</h1>
    </div>
  )
}

export default App
The increment function was designed to increase the count state variable by 1, but the problem arose when the value was incremented with a string instead of a number. TypeScript will throw an error message stating: 'Argument of type 'string' is not assignable to parameter of type 'SetStateAction<number>''. In this case, we didn't have to explicitly specify the type of the count variable since it was predefined in the useState hook with an initial value of 0, which is a number type. TypeScript automatically checks the type for us, which is similar to older, low-level languages such as C++ and C# where you had to specify the data type of the variable upon declaration before assigning it a value.
import { useState } from 'react'

function App() {
  const [count, setCount] = useState <number> (0)
  const increment = () => setCount( count + 1)

  return (
    <div className="App">
      <button onClick={increment}>Increment</button>
      <h1>Count: {count}</h1>

    </div>
  )
}

export default App
You can also use the annotation method of specifying the type like the example above, after the state variable insert the type of that state, such as <string>, <boolean>, <Array[]>, etc.
Let's try an example that uses an array of objects as an initial value with this code snippet below
import { useState } from 'react'

function App() {
  const [formData , setFormData]= useState <{
    id: number,
    name: string,
    email: string
    isverified: boolean
  }[]> ([{
    id:1,
    name:"margret",
    email: "sagaedeh@gmail",
    isverified: true
  }])
  return (
    <div className="App">
      {formData.map((data, i)=>{
        return(
          <h1>{data.name}</h1>
        )
      })}
    </div>
  )
}

export default App
In this example, we defined the type for the initial state value using angle brackets. We specified the object key and its value type, followed by an empty array to indicate that it is an array of objects. Inside the useState hook, the initial value is assigned the key and value type specified in the type definition. If any value other than the defined type is assigned, TypeScript will throw an error. Additionally, all the keys stated in the defined type must be represented in the initial value of the state. However, if you want to conditionally define a type, you can use a question mark to indicate that the value can be present or absent, meaning it is not compulsory."
In this example, we used a question mark to conditionally define a type. If we are not going to use the "isVerified" property frequently, we can add a question mark in front of it to indicate that it is optional. This allows us to use it occasionally without having to include it in every object. If the property is not included in the object, its value will be undefined.
import { useState } from 'react'

function App() {
  const [formData , setFormData]= useState <{
    id: number,
    name: string,
    email: string
    isverified ?: boolean
  }[]> ([{
    id:1,
    name:"margret",
    email: "sagaedeh@gmail",
    isverified : true

  }])
  return (
    <div className="App">
      {formData.map((data, i)=>{
        return(
          <h1>{data.name}</h1>
        )
      })}
    </div>
  )
}

export default App
the above code can be simplified by creating an interface, I guess you will be wondering what an interface means An interface is a schema for a custom datatype that specifies the structure and types that a value should have. It is used to enforce consistency in the codebase, especially when you are dealing with complex objects or complex applications here is an example below :
import { useState } from 'react'

export interface IForm {
  id: number,
    name: string,
    email: string
    isverified ?: boolean
}
function App() {
  const [formData , setFormData]= useState < IForm[]> ([{
    id:1,
    name:"margret",
    email: "sagaedeh@gmail",
    isverified : true
  }])
  return (
    <div className="App">
      {formData.map((data, i)=>{
        return(
          <h1>{data.name}</h1>
        )
      })}
    </div>
  )
}

export default App
In the provided code snippet, we have defined an interface called IForm, which specifies the initial type definition for an object. You can name the interface whatever you prefer. After defining the interface, we replaced the initial type with the IForm variable inside angular brackets, followed by an empty array outside the brackets. This approach enforces the consistency of the data structure and types. It is also worth mentioning that interfaces can be defined in a separate file, exported, and then imported into the required pages to reuse them throughout the codebase.
Passing Props in Typescript
In React with TypeScript, when passing props, it is necessary to define the type of the props. This is typically done using either the interface or type keyword to define the props type. In this article, we will be focusing on using the interface. in the following example, we will be passing the formData as props to this new Component
<div className="App">
      {formData.map((data, i)=>{
        return(
          <h1>{data.name}</h1>
        )
      })}
      <Another formdata={formData} />
    </div>
at the initial instance, the typescript will cry out stating that we haven't described the type of these props in the Another component. Here is how to describe the props type in a component
import * as React from 'react';
import { IForm } from '../App';

interface IProjectProps {
  formdata: IForm[]
}

const Project: React.FunctionComponent<IProjectProps> = (props) => {
  return(
    <div>
      {props.formdata.map((data,i)=>{
        return(
          <div>
            <h1>{data.name} </h1>
          </div>
        )
      })}

    </div>
  ) ;
};

export default Project;
In the above code, the IForm interface was imported into this component. Inside the IProjectProps interface, we defined the 'formdata' prop, which has the type of the IForm[] array, then annotated it inside an angular bracket in the component. Additionally, the component type was also defined as React.FunctionComponent. This is a way of defining a React functional component.
Handling forms:
handling forms with typescript is quite easy, lets's demonstrate with a simple example...
import * as React from 'react';
import { IForm } from '../App';

interface IProjectProps {
  formdata: IForm[];
  setformdata: React.Dispatch<React.SetStateAction<IForm[]>>;
}

const Project: React.FunctionComponent<IProjectProps> = (props) => {
  const [name, setName] = React.useState('');
  const [email, setEmail] = React.useState('');

  const submit = (e: React.FormEvent<HTMLFormElement>) => {
    e.preventDefault();
    const formData: IForm = {
      name: name,
      email: email
    };
    props.setformdata ( [...props.formdata, formData]);
  };

  return (
    <div>

          <div>
            <h1>The Form</h1>
            <form onSubmit={(e) => submit(e)}>
              <input  type='text' value={name} onChange={(e) =>           setName(e.target.value)} placeholder='name' />
              <input type='email' value={email} onChange={(e) =>   setEmail(e.target.value)} placeholder='Email' />
              <button>Submit</button>
            </form>
          </div>


    </div>
  );
};

export default Project;
In this component, we are still using the IForm interface that we defined in the App component. We had to pass the setFormData function as a prop from the App component and define it in the IProjectProps interface. The type for the setFormData function is React.Dispatch<React.SetStateAction<IForm[]>>. If you're not sure how to define these types, you can search for them on the internet or use an IDE like VSCode to hover over the function and see its tooltip with the defined type.
Now let's talk about the submit function. We define an event parameter for it, which is annotated as React.FormEvent<HTMLFormElement>. Using the spread operator, we add the form values to the formData object. You will also notice the inline onChange event handlers for the input fields. If we were to define them outside the JSX, we would have to define the type of the event as React.ChangeEvent<HTMLInputElement>.
conclusion
Overall, React with TypeScript is not much different from regular React, but the added type safety can make a big difference in catching errors early and making your code more maintainable. By properly defining the types you can write code that is more robust and easier to understand.


