Documenting My Project Called Developer's Arc
Implementing react router, Firebase Google Authentication, error boundary, pagination, lazy loading and others

frontend lover
Heyy!! developers, it's exciting to share my experience with you all, this will be my very first documentation of a project. And I hope whoever sees my code or reads my documentation will be satisfied beyond their imaginations and they will be glad they read it 😊.
Introduction
Two months ago (6th November 2022) I was given a task alongside others in the school I attend called AltSchool Africa, I was to implement firebase google Authentication, routing with nested routing, consuming an API specifically the Random user API, backend pagination, and error boundary.
I named this Project Developers Arc because it's basically an app where you meet with other developers around the world who have different skill sets. They share their details and from one level of acquaintance to another, you begin to share ideas and participate in paired programming, collaboration, and open-sourcing and increase your network. Therefore creating a community for yourself🧡. This project was built with React js, Firebase etc.
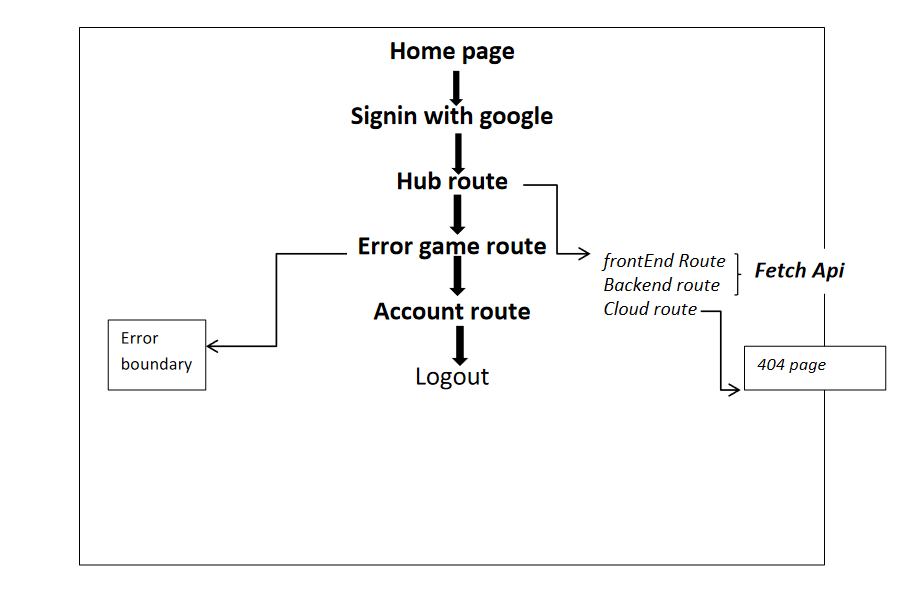
Structure of the App
How I Started the Project...
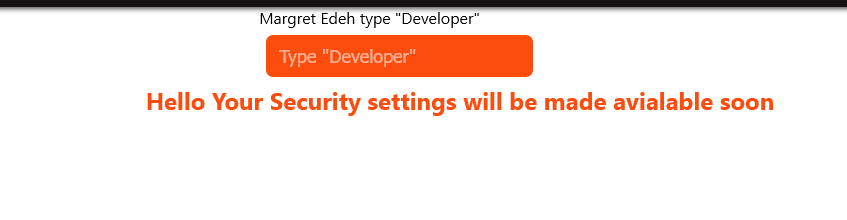
I started by preparing my development environment, I used vs code as my code editor and scaffolded the react app into my project. Had a hard time thinking of how to align all the implementations together to make a useful web app. I decided to think of UI, I sketched the idea I had on a paper and then based on my intuitions I choose the color orange and white to be the colors I will be using for this project (the colors were nice). I did my basic UI and it was the first time implementing firebase Google authentication in my project but we were given lessons on how to authenticate a particular project in our LMS, I also had help from the firebase documentation, it was tough but you know, giving up is not an option. The web app had three routes one of the routes had nested routes the second route was where I implemented an error boundary, but due to lack of time, I wasn't able to implement it correctly. the idea was just to test for errors so in that particular route, there was an input that throws an error when " Developer" is typed
then the last page is where a particular user can log out. I made the routes protected with this conditional statement below...
if(!user){
setTimeout(()=>{alert('login first')} ,1000)

  return(
      <Navigate to='/'/>
  )
}
If a user is not signed in, once you click on any of the pages it automatically takes you to the home page with an alert message saying "you have to sign in first". This feature is one I'd like to improve on when re-implementing my code, I want all the routes to be protected. Again because of time constraints, I wasn't able to make the project completely responsive to all screen sizes, which I was disgusted at but I had a deadline.

Features that Need Re-implementations and New Features
I went through my project and I discovered that most of these features are less efficient with a lot of functionality that was wrongly implemented and also discovered the need to add more features. so here is a list of the features I want to re-implement
making my project completely responsive to all screen sizes
implement Protected Routing
do more on error boundary and 404 page
SEO Re-implementation
pagination
some new features to be included are:
implement a search functionality
Skeleton loader
improved design.
Implemented Responsiveness:
In the initial design, the pages were not so responsive to all screen sizes especially the navbar for the mobile view. In the re-implementation I decided to make something different by making a navbar that slides from the bottom then the menu at the top inside the header spaced between the logo.
I had a route called more details within the user's card nested within the nested frontend routes, which was made possible through the functionality provided by the react-router hook called useParams. Before the reimplementation more details nested routes overflowed outsides the allocated screen for mobile devices. With the idea of Modals, I decided to make it such that, whenever "more details" is clicked the route div overlays the entire screen, to enable a user to see more details about a particular user. And this aided the responsiveness.

The area labeled 1 is the nested routes while 2 is the nav bar in its mobile form
  .show{
          width: 100vw;
          height: 100%;
          margin: 0;
          position: absolute;
          top: 0;
          right: 0px;
          left: 0px;
          background-color: rgba(64, 64, 69, 79);
  }
the code block for the modal......
Pagination
As the name implies pagination is a technique used to switch between pages mostly using the next and previous buttons. This functionality is seen in most modern applications. Pagination improves the UI of the application, for instance, the API I fetched from the random user returned about 100 users, I wouldn't want to display all the users at the same time so, I had to paginate them to display 4 users per page. to achieve this you need to know the total number of users, then the number of items you would like to display per page, the current page which is a state that will be updated based on the button click, the number of pages you would love to have the number of items to set off or skip when going to the next page. when rendering the users before mapping use the slice method to show the required users
.slice(skip, skip + PerPage) // the slice method to show current page items
  const [page, setPage]=useState(1);
  const PerPage= 4;
  const total= users?.length;
  const pages =10;
  const skip= page * PerPage - PerPage;

Search Functionality:
The first time I did this project I just had input with a placeholder search. I did not have the intention of making it functional. I added it to the project to improve the UI. I surveyed individuals and when they saw the search field they tried searching, but it wasn't functional, so I decided to implement the search functionality. There are different ways to search for data within a group of data. The goal is to be able to search for a particular user from the data fetched from the random user API. In my project, I had a state called the search which the initial value was set to an empty string, with a function called handleSearch which I used to implement the onchange event. Inside the handleSearch function, the search state was updated to take whatever is been typed in the search input. The filter method is what makes the search possible, filter methods filters' an array of data and return the data that meet the filter criteria. A function called theSearch takes a parameter of the data fetched from the random user API and then filters this data based on what is typed on the search input
  const [search, setSearch]= useState("")
  const HandleSearch=(e)=>{
    setSearch(e.target.value)
  }
 const thesearch =(data)=>{
    return data.filter((item)=> item.name.first.toLowerCase().includes(search.toLowerCase()))
  }
then mapped through the function with an argument of the data, this will enable the search functionality
{thesearch(users).map((each)=>{
            const {name, picture, location ,login} = each;
            return(

              <div className='each-user' key={login.uuid}>
                <img src={picture.large} alt={name.first} className='friend'/>
                <div>
                <h2 className='name'>Eng. {name.first}  {name.last} </h2>
                <h4 className='city'>{location.city}</h4>
                <h4 className='name'>{location.country} </h4>
                <NavLink key={login.uuid} className='more' to={login.uuid} >More Details </NavLink>
                 </div>
              </div>
            )
          }) }
Searching can be done another way by capturing the state through the URL. The React router hook called useSearchParams allows us to read and modify the query string in the URL, you can share a URL of what you searched. you can have a grasp of useSearchparams in this Article.
Skeleton Loader
Most modern web app like youtube and others shows a skeleton-like loader before the actual appearance of the component. it's like a preview before the actual data loads. This sort of effect is seen when waiting for a response from an API, when a particular component is lazily loaded, where there is a set time out before the component mounts the page etc. I used a react Library called React Loading Skeleton, with this library you can make beautifully animated loading skeletons that automatically adapt to your app. I installed the package inside my project, and did the necessary imports, of course, I had to read the documentation to guide me on how to use it. it has a <Skeleton/> component that should be used directly inside the component that we want to load.

Animated Skeleton Loader
Protected Routes
A route that is protected is a route that can only be accessed if a certain condition is met. In this case, if the user is authenticated the route can be accessed. otherwise, you will be stuck on the home page which is the index route. In my previous implementation of protected routes, I made the hub and account page protected by writing a conditional statement in each of them. The condition states that if there's no user then take me back to the home page.... this worked perfectly but I found a better way of executing this. I created a component called ProtectedRoutes, this component contained the conditional statement and then import inside the app.js then when rendering this component it will be wrapped around its children that is whichever route you want to protect
import { Navigate } from 'react-router-dom'
import { UserContext } from './AuthContext'
export default function ProtectedRoutes({children}) {
    const {user}= UserContext()
    if(!user){
        return <Navigate to="/"/>
    }
  return children;
}
then wrap the ProtectedRoutes around the necessary route..
    <Route
              path="/privacy"
              element={
                <ProtectedRoutes>
                  <Privacy />{" "}
                </ProtectedRoutes>
              }
            />
Error Boundary Re-Implementation
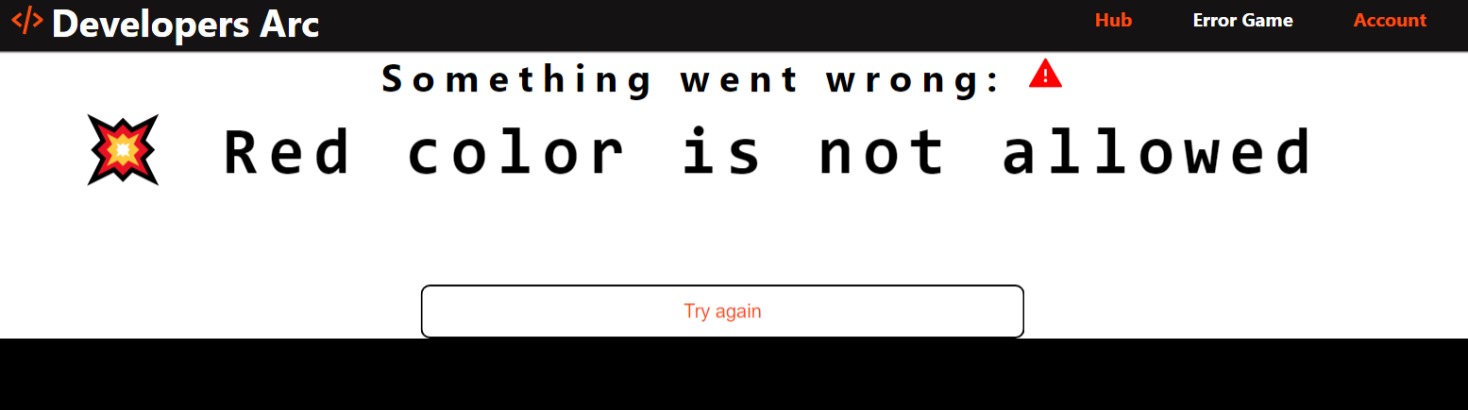
As a programmer, there's always prone to be an error in your code these errors might be compilers or run time errors. And it wouldn't be nice if our whole app breaks because of an error in a particular section in our code. React class component that includes life cycle methods like static getDerivedStateFromError() orcomponentDidCatch() enables us to catch errors in our code and provides us with a fallback UI to indicate the error. At the onset, I wanted to use the error boundary provided by the class-based react component, but then I wanted to make use of the error thrown by an event handler which is not possible if I am to use the class component. I decide to use the error boundary library provided by the npm package called React-error-boundary On the page where I implemented the error boundary it has a button that changes the background color of the page when clicked, but whenever the page's color is set to red it displays an error and a reset button telling you to try again.
import React from "react";
import "./errogame.css";
import { ErrorBoundary } from "react-error-boundary";
import { useErrorHandler } from "react-error-boundary";
import { AiFillWarning } from "react-icons/ai";

const ErrorFallback = ({ error, resetErrorBoundary }) => {
  return (
    <div className="error-text" role="alert">
      <h1>
        Something went wrong: <AiFillWarning style={{ color: "red" }} />{" "}
      </h1>
      <pre>{error.message}</pre>
      <button className="btn" onClick={resetErrorBoundary}>
        Try again
      </button>
    </div>
  );
};

const TheButton = () => {
  const [color, setColor] = React.useState("white");
  const colors = [
    "red",
    "yellow",
    "green",
    "blue",
    "purple",
    "orangered",
    "pink",
  ];
  const handleError = useErrorHandler();
  const handleClick = () => {
    try {
      const random = Math.floor(Math.random() * colors.length);
      setColor(colors[random]);
      console.log(colors[random]);
      if (colors[random] === "red") {
        throw new Error("💥 Red color is not allowed ");
      }
    } catch (error) {
      handleError(error);
    }
  };
  return (
    <div className={color}>
      <h1>Play Around with Random colors 🙂😎 </h1>
      <h2>Avoid the color Red 🎈 </h2>
      <button className="btn" onClick={handleClick}>
        random color
      </button>
    </div>
  );
};
export default function ErrorGame() {
  return (
    <div>
      <ErrorBoundary FallbackComponent={ErrorFallback}>
        <TheButton />
      </ErrorBoundary>
    </div>
  );
}
I also implemented a 404 page which I tested using the nested route inside the hub route called /cloud it's basically an image displaying 404
SEO Implementation
Search engine optimization is very good quality and it's advisable to always implement SEO in any of your projects. it is the process of making your project rank higher on Google. It helps improve your website visibility when it's been searched on search engines like Google etc. This Project is a single-page Application and the SEO for SPA sites is not efficient. There's a library called React-helmet-aync which I used to implement SEO in my project.
conclusion
I had a very exciting moment creating this article and developing this project here's the link to the project Dev Arc. Leave a comment on your thought about this project and any ideas that can improve this project. Thank you for reading ❣
Repo: MargretEdeh/my-exam-project (github.com)